Qt君


  • 首页

  • 关于

  • 归档

  • 搜索

Flat风格的Qml单选/复选按钮

发表于 2019-11-14

使用Qml的RadioButton与CheckBox控件修改而成。
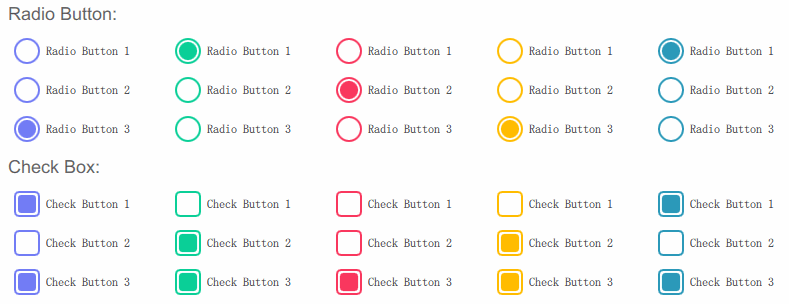
demo

单选按钮

  • RadioButton代码

    1
    2
    3
    4
    5
    6
    7
    8
    9
    10
    11
    12
    13
    14
    15
    16
    17
    18
    19
    20
    21
    22
    23
    24
    25
    26
    27
    28
    import QtQuick 2.0
    import QtQuick.Controls 2.0

    RadioButton {
    id: root

    property color checkedColor: "#0ACF97"
    text: qsTr("RadioButton")

    indicator: Rectangle {
    x: root.leftPadding
    anchors.verticalCenter: parent.verticalCenter
    width: 26; height: width
    antialiasing: true
    radius: width/2
    border.width: 2
    border.color: root.checkedColor

    Rectangle {
    anchors.centerIn: parent
    width: parent.width*0.7; height: width
    antialiasing: true
    radius: width/2
    color: root.checkedColor
    visible: root.checked
    }
    }
    }
  • RadioButton样式代码

    1
    2
    3
    4
    5
    6
    7
    8
    9
    10
    11
    12
    13
    14
    15
    16
    17
    18
    19
    20
    21
    22
    23
    24
    25
    26
    27
    28
    GridLayout {
    width: root.width
    rows: 5

    Repeater {
    model: ["#727CF5", "#0ACF97", "#F9375E", "#FFBC00", "#2B99B9"]

    Column {
    spacing: 15

    RadioButton {
    text: "Radio Button 1"
    checked: true
    checkedColor: modelData
    }

    RadioButton {
    text: "Radio Button 2"
    checkedColor: modelData
    }

    RadioButton {
    text: "Radio Button 3"
    checkedColor: modelData
    }
    }
    }
    }

复选按钮

  • CheckBox代码

    1
    2
    3
    4
    5
    6
    7
    8
    9
    10
    11
    12
    13
    14
    15
    16
    17
    18
    19
    20
    21
    22
    23
    24
    25
    26
    27
    28
    29
    import QtQuick 2.0
    import QtQuick.Controls 2.0

    CheckBox {
    id: root

    property color checkedColor: "#0ACF97"

    text: qsTr("CheckBox")

    indicator: Rectangle {
    x: root.leftPadding
    anchors.verticalCenter: parent.verticalCenter
    width: 26; height: width
    antialiasing: true
    radius: 5
    border.width: 2
    border.color: root.checkedColor

    Rectangle {
    anchors.centerIn: parent
    width: parent.width*0.7; height: width
    antialiasing: true
    radius: parent.radius * 0.7
    color: root.checkedColor
    visible: root.checked
    }
    }
    }
  • CheckBox样式源码

    1
    2
    3
    4
    5
    6
    7
    8
    9
    10
    11
    12
    13
    14
    15
    16
    17
    18
    19
    20
    21
    22
    23
    24
    25
    26
    27
    28
    GridLayout {
    width: root.width
    rows: 5

    Repeater {
    model: ["#727CF5", "#0ACF97", "#F9375E", "#FFBC00", "#2B99B9"]

    Column {
    spacing: 15

    CheckBox {
    text: "Check Button 1"
    checked: true
    checkedColor: modelData
    }

    CheckBox {
    text: "Check Button 2"
    checkedColor: modelData
    }

    CheckBox {
    text: "Check Button 3"
    checkedColor: modelData
    }
    }
    }
    }
  • 更多请关注公众号Qt君

C++源文件添加License模板

发表于 2019-11-13

本文介绍如何使用QtCreator为头文件和源文件添加License模板。

设置

  • 选项->C++->文件命名->License template

main_page

使用

  • 添加License文件后,使用QtCreator的新建C++文件会自动添加License文件里面的内容。

new_file_dialog

总结if/elif/else/endif宏之间的嵌套关系

发表于 2019-11-12

先前写的一个工具(Qml宏预处理工具)就顺便总结一下if/elif/else/endif之间的嵌套关系,并整理成表。

  从左到右顺序,与之上一个宏定义对比。除去2个无效项,共有14个有效项。

if elif else endif
if 创建子层 同层逻辑 同层逻辑 同层逻辑
elif 创建子层 同层逻辑 同层逻辑 同层逻辑
else 创建子层 无效 无效 同层逻辑
endif 创建分组层 上一层逻辑 上一层逻辑 上一层逻辑

  示例标注:

1
2
3
4
5
6
7
8
9
10
11
12
13
14
15
16
17
18
19
20
21
22
23
24
25
26
27
#if 
#if /* if -> if 创建子层 */
#elif /* if -> elif 同层逻辑 */
#else
#endif
#elif
#if /* elif - > if 创建子层 */
#elif
#elif
#endif
#else
#if /* else - > if 创建子层 */
#else
#endif
#endif

#if /* endif -> if 创建分组层 */
#if
#if
#if
#endif
#elif /* endif -> elif 上一层逻辑 */
#else
#endif
#else /* endif -> else 上一层逻辑 */
#endif
#endif /* endif -> endif 上一层逻辑 */

Qt支持的平台有哪些?

发表于 2019-11-11

整理一下Qt 5.13版本中支持那些平台。

平台 描述
Qt Quick WebGL 使用WebGL™实现流媒体的Qt快速用户界面的平台插件。
Qt for Android Android平台
Qt for Embedded Linux 嵌入式Linux平台
Qt for INTEGRITY Green Hills Software INTEGRITY实时操作系统(支持于Qt5.9)
Qt for Linux/X11 Linux/X11平台
Qt for QNX QNX平台
Qt for UWP 通用Windows平台(UWP)的设备上运行Qt应用程序
Qt for VxWorks VxWorks平台(商业可用)
Qt for WebAssembly 在浏览器的安全沙箱中运行Qt应用程序
Qt for Windows Windows平台
Qt for iOS IOS平台(移动端)
Qt for macOS macOS平台(桌面端)
Qt for MCUs 微处理器平台(评估版本非正式版)

Qt官方示例-语法高亮器

发表于 2019-11-10

语法高亮显示示例展示了如何执行简单的语法高亮显示(对C ++文件语法高亮)。

demo

  该示例主要使用QTextEdit和QSyntaxHighlighter实现。

  要提供自定义的语法突出显示,您必须子类QSyntaxHighlighter和重新实现highlightBlock函数,并定义自己的突出显示规则。

  使用QVector<HighlightingRule>存储高亮显示规则:规则由QRegularExpression模式和QTextCharFormat实例组成,然后配置好的highlightingRules,用于当文本块更新时自动调用highlightBlock函数刷新高亮显示文本。

1
2
3
4
5
6
struct HighlightingRule
{
QRegularExpression pattern;
QTextCharFormat format;
};
QVector<HighlightingRule> highlightingRules;

1
2
3
4
5
6
7
8
9
10
11
void Highlighter::highlightBlock(const QString &text)
{
foreach (const HighlightingRule &rule, highlightingRules) {
QRegularExpressionMatchIterator matchIterator = rule.pattern.globalMatch(text);
while (matchIterator.hasNext()) {
QRegularExpressionMatch match = matchIterator.next();
setFormat(match.capturedStart(), match.capturedLength(), rule.format);
}
}
...
}

  高亮显示文本格式有:

1
2
3
4
5
6
QTextCharFormat keywordFormat; // 关键词
QTextCharFormat classFormat; // 类名
QTextCharFormat singleLineCommentFormat; // 单行注释
QTextCharFormat multiLineCommentFormat; // 多行注释
QTextCharFormat quotationFormat; // 头文件引用
QTextCharFormat functionFormat; // 函数

  以添加类名高亮语法为例:

1
2
3
4
5
6
7
HighlightingRule rule;

classFormat.setFontWeight(QFont::Bold);
classFormat.setForeground(Qt::darkMagenta);
rule.pattern = QRegularExpression("\\bQ[A-Za-z]+\\b"); // 配置"类名"正则模式
rule.format = classFormat; // 配置"类名"的文本格式
highlightingRules.append(rule); // 添加到高亮显示规则容器,用于文本刷新

关于更多

  • 在QtCreator软件可以找到:

what_find

  • 或在以下Qt安装目录找到

    1
    C:\Qt\{你的Qt版本}\Examples\{你的Qt版本}\widgets\richtext\syntaxhighlighter
  • 相关链接

    1
    https://doc.qt.io/qt-5/qtwidgets-richtext-syntaxhighlighter-example.html
  • Qt君公众号回复『Qt示例』获取更多内容。

发布Qml宏预处理工具

发表于 2019-11-08

为Qml提供部分简单的预处理命令。

0x00 初衷

  在不改变和影响原有语法的前提下提高qml开发效率。有一些qml项目兼顾与Qt4与Qt5版本,由于QML不用编译,但解释在运行时,使预处理指令不能用于直接通过QML。一般采用的方法是直接改文件内容,也就仅限于部分的修改。如:
Qt4版本下:

1
import QtQuick 1.0

在Qt5版本下要修改成:

1
import QtQuick 2.0

  如果能像C/C++一样有预处理宏就不用那么麻烦了。本工具就是为了解决这一烦恼。

0x01 简单原理

  • 使用python语言实现
  • 和C/C++的#ifdef宏使用基本一样,但需要在其前添加//如:
  • 然后执行脚本将会对预处理语句进行分析,对于符合条件的将会去除//,否则将会添加//。
    1
    2
    3
    //#ifdef Qt4
    ...
    //#endif

等价于C/C++宏:

1
2
3
#ifdef Qt4
...
#endif

0x02 使用

  • 命令行运行run.py(文末源码地址)

    1
    python run.py {qml文件名} {宏定义(可多个)}
  • 例如:
    执行前python run.py Test.qml Qt5

    1
    2
    3
    4
    5
    //#ifdef Qt4
    import QtQuick 1.0
    //#else
    import QtQuick 2.0
    //#endif

  执行后

1
2
3
4
5
//#ifdef Qt4
//import QtQuick 1.0
//#else
import QtQuick 2.0
//#endif

0x03 源码

1
https://github.com/aeagean/QmlPreprocessing

0x04 测试代码

1
2
3
4
5
6
7
8
9
10
11
12
13
14
15
16
17
18
19
20
21
22
23
24
//#ifdef Qt4
//import QtQuick 1.0
//#else
import QtQuick 2.0
//#endif

//#ifdef Qt5.7
//import QtQuick.Controls 2.0
//#else
import "Combobox"
//#endif

Item {
width: 100; height: 100

//#ifdef Qt5
MultiPointTouchArea { /* Qt5多点触控 */
}
//#endif

ComboBox {
model: ["First", "Second", "Third"]
}
}

QDebug小知识

发表于 2019-11-08

QDebug在开发过程中使用得较多,整理了一些较少用却很有用的知识。

禁用自动插入空格

1
QDebug &QDebug::nospace()

对比:

1
2
3
4
5
qDebug() << "Hello" << "world!";
qDebug().nospace() << "Hello" << "world!";
输出:
Hello world!
Helloworld!

禁用引号字符

  禁用在 QChar,QString 和 QByteArray内容周围自动插入引号字符。当开启引号字符禁用时,这些类型的打印将不带引号字符,也不会转义不可打印的字符。

1
QDebug &QDebug::noquote()

对比:

1
2
3
4
5
qDebug() << QString("Hello world!");  
qDebug().noquote() << QString("Hello world!");
输出:
"Hello world!"
Hello world!

不需要引用QDebug头文件也可使用qDebug()

  如果向函数传递格式字符串和参数列表,则其工作方式与C语言的printf()函数类似。格式应为Latin-1字符串。

1
qDebug(const char *message, ...)

如:

1
qDebug("%s", "Hello world!");

屏蔽qDebug打印

  项目文件(.pro)添加

1
DEFINES+= QT_NO_DEBUG_OUTPUT

python学习笔记

发表于 2019-11-07

记录学习python中的简短笔记。

  • 正则模块
    它提供 Perl 风格的正则表达式模式。

    1
    2
    3
    4
    # 导入正则模块
    import re
    # 正则处理
    re.match(r'^\s*//#if ', each)
  • 获取列表长度

    1
    2
    list = [1, 2, 3]
    length = len(list)
  • 判断变量是否在列表

    1
    2
    3
    4
    5
    list = [1, 2, 3]
    if 1 in list:
    print('true')
    else:
    print('false')
  • 遍历列表
    (1)常规遍历

    1
    2
    3
    list = [1, 2, 3]
    for each in list:
    print(each)

  (2)遍历返回列表下标index与项值each

1
2
3
list = [1, 2, 3]
for index, each in enumerate(list):
print(index, each)

  • 指定函数的参数类型和返回值类型
    (1) a:int为指定参数a类型为int
    (2)-> int为指定返回值类型为int

    1
    2
    def test(a:int) -> int
    pass
  • 逻辑与和逻辑或
    在python中是没有&&和||这两个运算符的,而是使用and和or代替。

  • 类的构造/析构函数
    (1) __init__构造函数
    (2) __del__析构函数

    1
    2
    3
    4
    5
    class Item:
    def __init__(self):
    pass
    def __del__(self):
    pass
  • 获取命令行参数

    1
    2
    3
    import sys
    print(sys.argv) # 打印参数列表
    printf(len(sys.argv)) # 打印参数个数
  • “main函数入口”

    1
    2
    if __name__ == '__main__':
    ...

Qt C++11支持

发表于 2019-11-06

  Qt4版本下仅Qt4.7与Qt4.8支持C++11,在pro文件添加以下代码即可:

1
QMAKE_CXXFLAGS += -std=c++0x

  Qt5版本以上添加以下代码:

1
CONFIG += C++11

QJson第三方JSON处理库

发表于 2019-11-04

QJson是基于Qt的库,可将JSON数据映射到QVariant对象。JSON数组将映射到QVariantList实例,而JSON对象将映射到QVariantMap。

  JSON(JavaScript对象表示法)是一种轻量级的数据交换格式。它可以表示整数,实数,字符串,值的有序序列以及名称/值对的集合。

  QJson库建议用于Qt4版本下,Qt5版本以上建议使用Qt自带的json库。

编译要求

  • Qt 4.5版本以上。
  • CMake 2.6版本以上。

示例

  • 序列化(将QMap转为QByteArray字节串):

    1
    2
    3
    4
    5
    6
    7
    8
    9
    10
    11
    QVariantMap map;
    map["key"] = "value";

    bool ok;
    QJson::Serializer serializer;
    QByteArray result = serializer.serialize(map, &ok);
    if (!ok) {
    qDebug() << "Error: Data serialize error!";
    return false;
    }
    qDebug() << result;
  • 反序列化(将字符串转QMap):

    1
    2
    3
    4
    5
    6
    7
    8
    bool ok;
    QJson::Parser parser;
    QVariant result = parser.parse("{\"key\" : \"value\"}", &ok);
    if (!ok) {
    qDebug() << "Error: Data parse error!";
    return false;
    }
    qDebug() << result.toMap();

关于更多

  • Qt君公众号回复『JSON』获取更多信息。
  • 源码地址:
    https://github.com/flavio/qjson
123…32
Qt君

Qt君

313 日志
41 标签
© 2019 Qt君
由 Hexo 强力驱动
|
主题 — NexT.Gemini v5.1.4
粤ICP备 - 16070052号